Your Trusted Source for Home Fixes & Guides

Fix Kitchen Sink Drain: Quick Solutions for a Clogged Sink

Fix Kitchen Sink Drain is a common DIY task that can save you time and money. If you’re looking to fix kitchen sink drain problems, issues like clogs, leaks, or slow drainage can often be resolved with the right tools and a few simple steps. This guide covers practical repair methods, common causes, and expert tips to help you restore proper drainage and keep your kitchen sink working smoothly.
Understanding Kitchen Sink Drains
Before you start fixing, it helps to know how your kitchen sink drain works. The drain consists of several parts:
- Strainer: The piece that sits in the sink, catching large debris.
- Tailpiece: The straight pipe connected to the strainer.
- P-trap: The curved section that prevents sewer gases from entering your home.
- Trap arm: Connects the P-trap to the wall pipe.
- Drainpipe: Leads to the main house plumbing.
Most problems start in the strainer, P-trap, or drainpipe. Food scraps, grease, and soap can build up, causing blockages or leaks. Even small bits of food, like rice or eggshells, can get trapped and lead to bigger issues over time. Grease is a major culprit: it cools, hardens, and clings to pipe walls, narrowing the passage.
Common Signs Of Drain Problems
Look out for these issues:
- Water draining slowly or not at all
- Bad smells coming from the sink
- Water pooling under the sink
- Gurgling sounds
If you notice these signs, it’s time to take action. Small problems can turn into big repairs if ignored. For example, a slow drain may not seem urgent, but it often means a blockage is growing somewhere. Water pooling under your sink can also damage cabinets and attract pests, like ants or cockroaches, if left unaddressed.
Safety Precautions Before You Start
Always put safety first. Here are important steps:
- Turn off water supply if you need to remove pipes.
- Wear rubber gloves to protect your hands from dirty water and sharp edges.
- Place a bucket under the pipes to catch spills.
- Keep children and pets away from your workspace.
- If you smell gas or see electrical wires, stop and call a professional.
Some repairs involve chemicals or tools. Always read instructions and follow manufacturer guidelines. Even if you’re just tightening a pipe, water can spray out unexpectedly, so it’s wise to have towels ready. If you’re working under the sink, a flashlight and knee pads can make the job more comfortable.
One tip that’s often missed: open a window or turn on a fan if you’re using cleaners, to avoid breathing fumes. And always check that your tools are in good shape—worn pliers or a rusty wrench can slip and cause injury.
Tools And Materials Needed
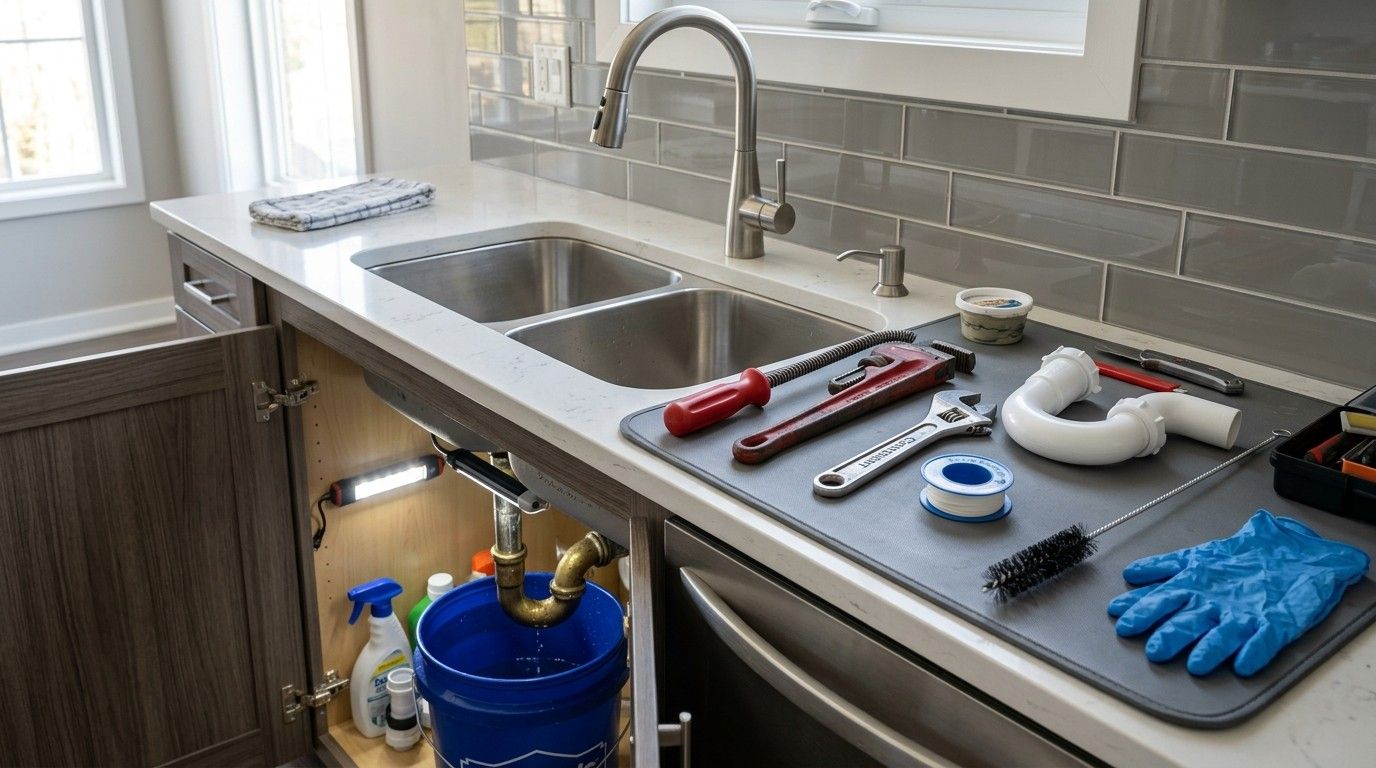
Having the right tools makes the job easier and safer. Most kitchen sink drain fixes need:
- Plunger
- Pipe wrench
- Channel-lock pliers
- Plumber’s snake (also called auger)
- Bucket
- Rubber gloves
- Flashlight
- Old towels or rags
- Replacement washers or gaskets
- PVC pipe (if replacing parts)
- Plumber’s putty
- Teflon tape
For tougher clogs, you may need drain cleaner. Use chemical cleaners carefully, and avoid mixing products. If you’re new to plumbing, buy a basic home plumbing kit—these often include small brushes and extra washers.
A non-obvious tip: keep a small mirror handy. Sometimes, leaks or cracks are hidden behind pipes, and a mirror can help you see hard-to-reach places without twisting your body uncomfortably.
Fixing A Clogged Kitchen Sink Drain
Clogs are the most common kitchen sink drain problem. They usually come from food scraps, grease, coffee grounds, or soap buildup. Even dish soap can add to the problem if you use too much or mix it with grease.
Step 1: Try Hot Water
Pour boiling water slowly into the drain. This can melt grease and loosen minor blockages. Repeat two or three times. If the water drains, you’re done.
But be careful: if you have PVC pipes, don’t use boiling water too often, as it can weaken or warp the plastic over time. For metal pipes, boiling water is usually safe.
Step 2: Use A Plunger
Cover the sink opening with a plunger and pump up and down for 30 seconds. If you have a double sink, seal the other side with a wet rag first. Plunging often clears simple clogs.
Make sure the plunger is filled with enough water to cover the rubber cup. This helps create a good seal and makes plunging more effective. After plunging, run water to check if the blockage is cleared.
Step 3: Check The P-trap
If plunging doesn’t work, the clog may be in the P-trap.
- Put a bucket under the P-trap.
- Use channel-lock pliers to loosen slip nuts.
- Remove the P-trap and empty the contents into the bucket.
- Clean the P-trap with water and a brush.
- Reattach the P-trap, making sure washers are tight.
Don’t rush this step. If the P-trap is full of thick debris, use an old toothbrush or bottle brush to scrub the inside. Many beginners forget to check the washer for cracks or flattening—replace it if it looks worn.
Step 4: Use A Plumber’s Snake
If the clog is deeper, try a plumber’s snake.
- Feed the snake into the drain or wall pipe.
- Rotate the handle to break up the blockage.
- Pull the snake out and clean off debris.
- Flush the drain with hot water.
Move the snake slowly and feel for resistance. When you hit the clog, twist and push gently. For stubborn clogs, you might need to repeat this step a couple of times. Don’t force the snake too hard, or you might damage the pipe.
Step 5: Try Safe Chemical Cleaners
If the above steps fail, use an enzyme-based drain cleaner. Avoid harsh chemicals, which can damage pipes and harm the environment. Always follow the directions on the product.
Some enzyme cleaners work overnight, so be patient and let the product sit as recommended. These cleaners are safe for septic systems and regular use.
Step 6: When To Call A Professional
If you can’t clear the clog after trying these steps, or if you notice water backing up into other sinks, call a licensed plumber. Some blockages are deep in the main line and need special equipment.
A professional can also check for hidden problems, like tree roots in the main drain or collapsed pipes—issues not easily visible to homeowners.
Case Study: Clearing A Persistent Clog
Susan, a homeowner in Ohio, faced a stubborn kitchen sink clog. She tried hot water and a plunger, but nothing worked. When she removed the P-trap, she found thick grease inside. After cleaning it, the sink drained perfectly. Later, she learned her family often poured cooking oil down the sink—a common mistake.
Susan now keeps a small container for used oil and avoids pouring fats down the drain.
This shows how habits can cause repeat problems. If you fix a clog but don’t change what goes down the drain, you’ll likely face the same issue again. Susan’s simple change—collecting oil in a jar—prevented future clogs.
Fixing A Leaky Kitchen Sink Drain
Leaks can waste water, cause mold, and ruin cabinets. They usually come from loose connections, worn washers, or cracks in pipes. Even a small, slow leak can soak wood under the sink and create a musty smell.
Step 1: Find The Source
Dry the area under the sink. Run water and look for drips. Common leak spots:
- At the strainer (where it meets the sink)
- At the P-trap connections
- Along the tailpiece
- From cracks in pipes
If you can’t spot the leak, use a paper towel to dab each connection—wet spots will show quickly.
Step 2: Tighten Connections
Most leaks are from loose slip nuts. Use channel-lock pliers to gently tighten them. Don’t overtighten—this can crack plastic parts.
If you see water beading around a joint after tightening, stop and check if the washer is out of place or missing. It’s a common beginner mistake to miss a washer during reassembly.
Step 3: Replace Washers And Gaskets
If tightening doesn’t help, the washer or gasket may be worn. Remove the leaking section, replace the washer, and reassemble.
Washers are cheap and easy to find at any hardware store. Keep a few extras in your toolbox—they wear out over time. Always install the washer flat and centered for a proper seal.
Step 4: Re-seal The Strainer
Leaks around the strainer often need plumber’s putty.
- Remove the strainer.
- Clean off old putty.
- Roll new putty into a rope and press it around the strainer edge.
- Reinstall the strainer and tighten.
After tightening, wipe away extra putty that squeezes out. Let the putty set for 15–20 minutes before running water.
Step 5: Replace Damaged Pipes
If you see cracks, replace the pipe. PVC pipes are affordable and easy to cut. Make sure to match the size and length. Use Teflon tape on threaded connections.
If you’re unsure about cutting, most hardware stores will cut pipes to size for you. Always dry-fit pieces before final tightening to check for proper alignment.
Step 6: When To Call A Professional
If you can’t find the leak, or if water is coming from behind walls, call a plumber. Hidden leaks can cause serious damage.

Common Mistakes
- Using too much force and cracking pipes
- Forgetting to check washers
- Skipping the use of plumber’s putty
- Not drying the area before testing
It’s easy to overlook a small drip, but catching it early saves big repairs later. Always check under your sink after repairs, even days later, to be sure it’s dry.
Fixing A Slow Kitchen Sink Drain
Sometimes water drains slowly, even if there’s no full blockage. This can mean buildup inside pipes, poor venting, or an issue with the main drain.
Step 1: Clean The Strainer
Remove and clean the strainer. Food and debris often collect here. Even a buildup of soap scum or small pasta pieces can block water flow.
Step 2: Flush With Hot Water And Vinegar
Pour boiling water followed by one cup of baking soda and one cup of white vinegar. Wait 15 minutes, then flush again with hot water. This helps dissolve grease and soap scum.
This method is gentle and safe for all pipes. It’s also a good regular maintenance routine—even if your drain isn’t clogged.
Step 3: Inspect The P-trap
Check for partial clogs in the P-trap. Clean as described earlier. Sometimes, a slow drain is caused by partial obstructions that haven’t stopped water completely but are reducing flow.
Step 4: Check Air Vents
If your sink gurgles or drains slowly, the air vent may be blocked. This vent allows air to flow and helps water drain. If you suspect venting problems, call a plumber—roof vents are best handled by professionals.
A blocked vent can also cause water to be pulled from the P-trap, leading to smells. Many homeowners overlook venting as a cause of slow drains.
Step 5: Look For Pipe Slope Issues
If the drainpipe isn’t sloped correctly, water will drain slowly. Pipes should slope about 1/4 inch per foot toward the main drain. Adjusting slope often requires cutting and re-fitting pipes.
Improper slope is a hidden cause of slow drains in older homes or after a DIY repair. Always check pipe angles if you’ve had repeated problems.
Replacing Kitchen Sink Drain Parts
If your drain is old or damaged, replacing parts can solve leaks and prevent future issues.
Step 1: Remove Old Parts
Disconnect pipes and remove the strainer, tailpiece, P-trap, and trap arm as needed. Use pliers and a wrench.
Take photos before disassembly if you’re new to plumbing. This helps you remember the order and orientation of parts.
Step 2: Match New Parts
Take old parts to the hardware store to match size and length. Most kitchen sink drains use 1-1/2 inch PVC pipes.
Don’t mix different materials unless you use the correct adapters. For example, connecting metal and PVC pipes without an adapter can cause leaks.
Step 3: Install New Parts
- Apply plumber’s putty to the strainer.
- Assemble pipes, tightening slip nuts by hand.
- Use Teflon tape on threaded areas.
- Check alignment and slope.
Make sure pipes don’t touch the cabinet sides. Vibrations can loosen connections over time.
Step 4: Test For Leaks
Run water and check for drips. Tighten connections if needed. After installation, leave a dry paper towel under the sink—any drip will show up clearly.
Cleaning And Maintenance Tips
Regular cleaning helps prevent clogs and leaks.
- Run hot water after every use to flush away grease.
- Don’t pour oil, grease, or coffee grounds down the drain.
- Use a sink strainer to catch food scraps.
- Clean the P-trap every 3–6 months.
- Flush the drain with vinegar and baking soda monthly.
- Inspect for leaks and loose connections twice a year.
An extra tip: once a month, fill the sink with hot water, then pull the plug to let it flush through the pipes quickly. This helps clear minor buildup before it becomes a problem.
Comparing Drain Cleaning Methods
Choosing the right cleaning method depends on the type and severity of the problem. Here’s a comparison of common drain cleaning approaches:
| Method | Effectiveness | Safety | Cost | Recommended For |
|---|---|---|---|---|
| Hot Water Flush | Low | High | Minimal | Minor grease buildup |
| Plunger | Medium | High | Minimal | Simple clogs |
| Plumber’s Snake | High | Medium | Moderate | Deeper blockages |
| Enzyme Cleaner | Medium | High | Moderate | Organic buildup |
| Chemical Cleaner | Medium | Low | Moderate | Stubborn clogs (as last resort) |
| Professional Service | Very High | Very High | High | Serious or hidden clogs |
Many homeowners jump to chemical cleaners too quickly. These can make matters worse if the clog is caused by a solid object (like a spoon or bone). Always try physical methods first. Enzyme cleaners are best for monthly maintenance, while plungers and snakes are for active blockages.
When To Call A Licensed Plumber
Not every drain problem can be fixed with DIY methods. Here’s when to call a professional:
- Water is backing up into other sinks or appliances.
- You see signs of water damage, mold, or rotten wood.
- The clog is deep and unreachable with a snake.
- Pipes are corroded or damaged.
- You suspect venting or main sewer issues.
- There’s a strong sewer smell in your kitchen.
- You’re uncomfortable working with plumbing.
A skilled plumber can use advanced tools like hydro jetting or video inspection to find and fix tough problems. They can also spot problems you might not notice, like pinhole leaks or improper venting.
Comparing Diy Vs Professional Repairs
Deciding between fixing the drain yourself or hiring a pro? Here’s a quick side-by-side:
| Aspect | DIY | Professional |
|---|---|---|
| Cost | Low (tools and parts only) | High ($100–$350 average) |
| Time | 1–2 hours | 30–60 minutes |
| Skill Needed | Basic to moderate | Expert |
| Risk | Possible mistakes, leaks | Minimal, insured |
| Warranty | None | Usually provided |
One insight: Some plumbing jobs look simple but can become complicated if your home has older or non-standard pipes. If you try a repair and feel uncertain, don’t hesitate to call a professional before causing more damage.
Case Study: Professional Help Prevents Major Damage
Tom, a homeowner in Texas, noticed slow drainage and water under his kitchen sink. He tried cleaning the P-trap and using a snake, but water kept leaking. He called a plumber, who found a cracked pipe behind the wall. Tom’s quick action saved him from expensive repairs and mold.
The plumber replaced the pipe and provided a warranty for the work.
Tom’s experience shows the value of knowing when to call for help. Ignoring leaks behind walls can ruin cabinets, flooring, and even the structure of your house.
Preventing Future Kitchen Sink Drain Problems
Prevention saves money and hassle. Here’s how to keep your drain trouble-free:
- Use a sink strainer every day.
- Avoid pouring grease or oil down the drain.
- Dispose of food scraps in the trash, not the sink.
- Clean pipes regularly with safe methods.
- Check for leaks and loose connections.
- Teach family members proper use.
- Schedule professional inspection every few years.
A less obvious tip: wipe greasy pans with a paper towel before washing. Even small amounts of oil can build up in pipes over time. Also, run cold water when grinding food in a garbage disposal—this helps solidify fats so they grind up and flush away more easily.
Kitchen Sink Drain Materials: What’s Best?
If you need to replace parts, choosing the right material matters. Here’s a comparison:
| Material | Durability | Cost | Ease of Installation | Common Issues |
|---|---|---|---|---|
| PVC | High | Low | Easy | Can crack if overtightened |
| Metal (chrome/brass) | Medium | Medium | Moderate | Corrosion over time |
| ABS | Medium | Low | Easy | Less common, brittle |
For most homes, PVC is the best choice. It’s durable, easy to install, and affordable. Metal pipes look nice but can corrode if water stands in them. ABS is less common, but you may find it in older homes. Always check local plumbing codes before replacing materials.
Real-world Drain Fix: Homeowner Experience
Let me share a personal story. Last year, my own kitchen sink started draining slowly. I poured hot water and used a plunger, but the problem returned. After removing the P-trap, I found a wad of potato peels stuck inside.
Cleaning it solved the issue. Since then, I’ve used a strainer every day and remind my kids not to dump food scraps in the sink. Small changes can make a big difference.
Another lesson I learned: don’t ignore the first signs of a slow drain. If I had waited, the clog would have gotten worse and possibly caused a leak.
Frequently Asked Questions
How Often Should I Clean My Kitchen Sink Drain?
You should clean the drain and P-trap every 3–6 months. Regular cleaning prevents buildup and keeps water flowing smoothly. For homes with lots of cooking, monthly cleaning is even better.
What Is The Safest Way To Unclog A Kitchen Sink Drain?
Start with hot water, a plunger, or an enzyme-based drain cleaner. Avoid harsh chemicals, which can damage pipes and harm your health. If you use a snake, move slowly to avoid damaging pipes.
Why Does My Kitchen Sink Smell Bad?
Bad smells usually come from trapped food, grease, or bacteria in the P-trap. Clean the P-trap and flush the drain with vinegar and baking soda. If the smell returns quickly, check for hidden leaks or venting problems.
Can I Fix A Leaking Kitchen Sink Drain Myself?
Yes, most leaks are easy to fix. Tighten connections, replace worn washers, and use plumber’s putty around the strainer. If you can’t find the leak or it’s behind walls, call a plumber. Always dry the area before and after repairs.
How Do I Choose The Right Drain Cleaner?
Look for enzyme-based cleaners for regular maintenance. Reserve chemical cleaners for tough clogs, and always follow safety instructions. For more guidance, check out Family Handyman.
Fixing your kitchen sink drain doesn’t need to be stressful. With the right approach, tools, and knowledge, you can solve most problems yourself. Remember to stay safe, avoid common mistakes, and don’t hesitate to call a pro when needed. A well-maintained kitchen sink keeps your home clean and comfortable, saving you money and headaches in the long run.