Your Trusted Source for Home Fixes & Guides

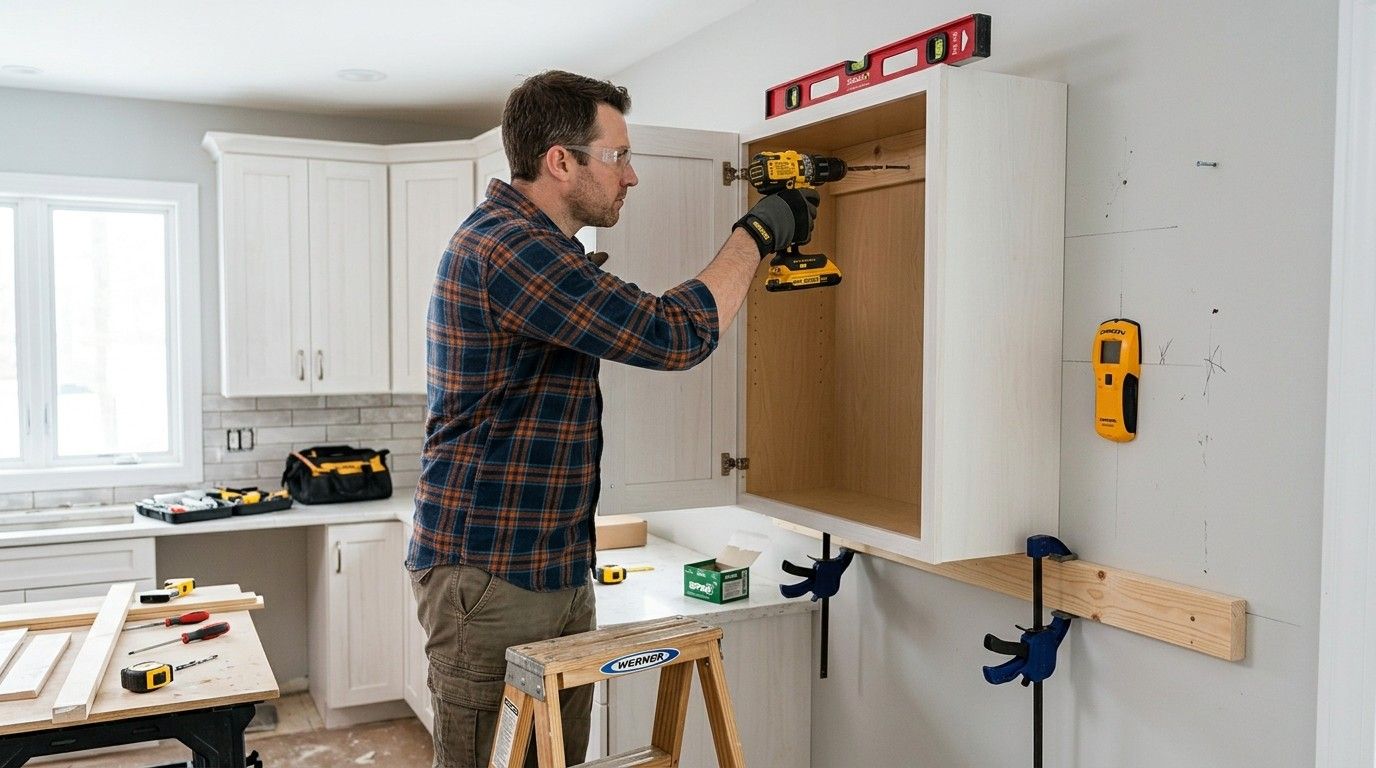
How to Attach Cabinets to Wall: Step-by-Step Guide 2026

Attaching cabinets to the wall is a key part of any kitchen or bathroom remodel. How to Attach Cabinets to Wall is an important skill for homeowners because cabinets hold heavy dishes, tools, and supplies and must be anchored safely and securely. If you’re planning your first cabinet installation or replacing old units, understanding proper stud placement, mounting hardware, and alignment can make the process much easier. This guide covers the essential steps to help you install wall cabinets securely and confidently.
I’ve been through many kitchen and bathroom remodels—both as a DIYer and working alongside licensed pros. In this guide, I’ll walk you through the process step-by-step, highlight safety and code tips, and share honest advice that’ll help you avoid common mistakes.

This article is designed for real homeowners, not contractors. I’ll use plain English, cover all the important details, and include real-world insights based on years of hands-on experience. By the end, you’ll know exactly what tools you’ll need, how to find wall studs, how to get cabinets perfectly level, and when it’s smarter to call a professional.
Whether your walls are drywall, plaster, or even concrete, you’ll get the know-how to attach cabinets with confidence.
Why Secure Cabinet Attachment Matters
Many people don’t realize just how heavy kitchen cabinets can get once they’re full. An average 30-inch upper cabinet, fully loaded, can easily weigh over 150 pounds. A poorly attached cabinet is a serious safety hazard: it can pull away from the wall, damage your home, or cause injury. For bathrooms, laundry rooms, or garage projects, similar risks exist. That’s why building codes and manufacturers insist that cabinets are attached directly to wall studs, not just drywall.
Tools And Materials You’ll Need
Before you start, assemble the right tools and supplies. Using the proper equipment will make the job faster and safer. Here’s what most homeowners need:
- Stud finder (essential for locating studs behind drywall)
- Drill/driver (cordless preferred)
- Level (4-foot level ideal for long runs)
- Tape measure
- Pencil
- Cabinet screws (2 1/2″ to 3″ long, washer-head, specifically for cabinets)
- Clamps (for holding cabinets together)
- Shims (plastic or wood, for leveling)
- Safety gear (goggles, gloves)
- Step ladder
- Countersink bit (optional, for neat screw holes)
- Wood filler or caulk (for touch-up)
- Stud-to-stud ledger board (a long, straight 1×3 or 1×4 board)
- Shop vacuum (for cleanup)
You might need a hammer, utility knife, or oscillating tool if you have to remove old cabinets. For concrete walls, you’ll need masonry anchors and a hammer drill.
Planning And Prep: Getting It Right Before You Drill
Measure Twice, Drill Once
Cabinet installation success starts with careful planning. Take time here, and the rest of the job gets much easier.
- Sketch a layout: Draw your wall on paper. Mark windows, doors, and outlets.
- Mark cabinet locations: Use a pencil to lightly outline each cabinet’s position on the wall.
- Check for obstructions: Open outlets, pipes, or HVAC vents can affect mounting.
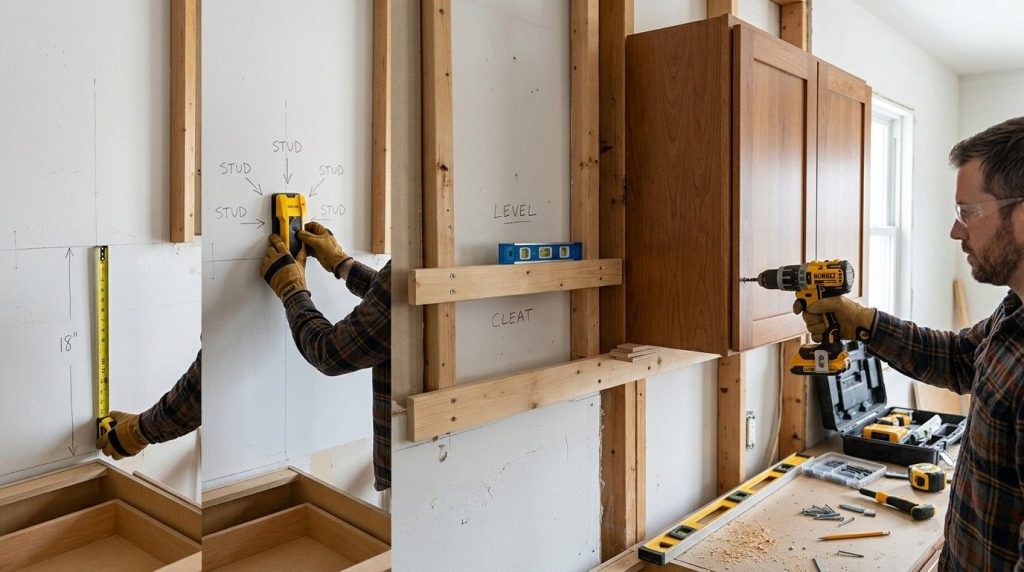
- Find and mark studs: Use your stud finder to locate all wall studs where cabinets will attach. Mark their centers with vertical pencil lines from ceiling to floor.
Pro Tip: Not All Studs Are Exactly 16” Apart, Especially In Older Homes. Always Check Each Stud Location.
Removing Old Cabinets
If you’re replacing old cabinets, remove them carefully. Start with doors and shelves, then unscrew the cabinet bodies from the wall. Have a helper ready—upper cabinets can be heavy and awkward.
Case Study: Cabinet Failure From Missed Studs
A homeowner in Pennsylvania tried to hang new kitchen cabinets but used drywall anchors instead of hitting the studs. Within a year, the upper cabinet began to pull out from the wall, cracking the drywall and damaging dishes. The fix required removing the damaged cabinet, patching the wall, and reinstalling—doubling the cost and effort. This is a classic example of why stud attachment is not optional.
Wall Types: Drywall, Plaster, Concrete
Most homes in the U. S. have drywall over wood studs, but older homes may have plaster and lath, and some basements or garages have concrete block.
- Drywall over wood studs: Easiest for DIYers. Use a stud finder and standard cabinet screws.
- Plaster and lath: Harder to locate studs; use a strong magnet to find nails or screws in studs, and predrill to avoid cracking plaster.
- Concrete/masonry: Cabinets must be attached using masonry anchors or Tapcon screws. Never rely on glue or drywall anchors.
If your wall is unusual (metal studs, brick, or foam insulation), consult a pro or manufacturer’s instructions.
How To Attach Upper Cabinets: Step-by-step
Upper cabinets are installed first, before base cabinets. This prevents working over a countertop and gives you more room to maneuver. Here’s how to do it safely and accurately.
1. Mark A Level Line For Upper Cabinets
Most upper cabinets are installed so the bottom edge is 54″ above the finished floor (18″ above a 36″ countertop). Use your level to draw a straight line at this height. Double-check that the line is level across the full run, even if the floor isn’t.
2. Install A Temporary Ledger Board
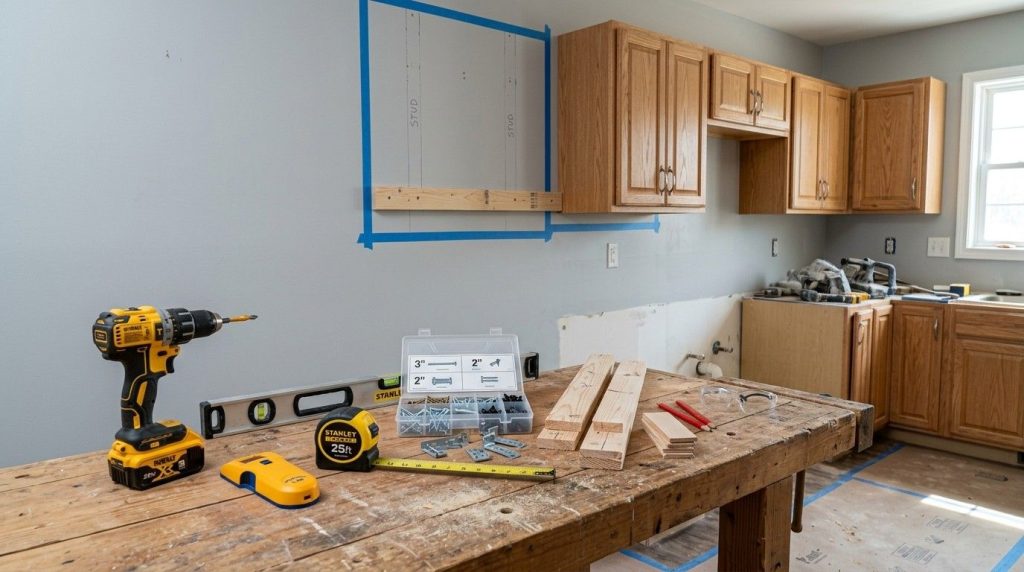
Screw a straight 1×3 or 1×4 board into the wall studs just below your level line. This ledger board supports the cabinets as you lift them into place, making solo installation possible and reducing the risk of dropping cabinets.
3. Pre-drill Cabinets
Most cabinets come with a hanging rail at the top and bottom, inside the back panel. Pre-drill holes through these rails at stud locations. Use a countersink bit if you want the screw heads to sit flush.
4. Hang Cabinets
With a helper, lift the first cabinet onto the ledger board. Align the side with your layout mark. Use long cabinet screws to anchor the cabinet through the predrilled holes into the wall studs. Do not overtighten—you want the screw snug but not crushing the wood.
5. Connect And Level Cabinets
As you add more cabinets, clamp neighboring units together at the face frames. Check for level and plumb before screwing them together. Use shims behind the cabinet if the wall isn’t perfectly flat. Secure each cabinet to the wall at every stud location.
6. Remove The Ledger And Touch Up
Once all upper cabinets are secure, remove the ledger board. Fill any holes with wood filler or caulk. Reinstall shelves and doors.
Key Data: Cabinet Screw Strength
The average #10 cabinet screw (3” long) can support up to 150 lbs in solid wood stud. But when installed in drywall only, the same screw supports less than 20 lbs—never enough for safe cabinet mounting.
How To Attach Base Cabinets
Base cabinets are easier to handle but require careful leveling for countertops. Here’s the process:
- Mark the base cabinet layout on the wall. Draw level lines at the top edge (usually 34 1/2” above finished floor).
- Start in a corner, or at a fixed point like a stove opening.
- Set the first cabinet in place. Shim under the base or behind the back to achieve perfect level and plumb.
- Secure to wall studs using cabinet screws through the back rail. Most base cabinets use 2-3 screws per stud.
- Connect adjacent cabinets by clamping and screwing through the face frame or side panels.
- Check for level repeatedly. Even a small tilt will cause countertop or door problems later.
Table: Cabinet Fastener Comparison
Here’s how different fasteners perform for cabinet installation:
| Fastener Type | Material | Load Capacity | Recommended For |
|---|---|---|---|
| Cabinet Screw (#10, 3″) | Steel | Up to 150 lbs (stud) | Wood stud walls |
| Drywall Anchor | Plastic/metal | 15–25 lbs | Not for cabinets |
| Tapcon/Masonry Anchor | Steel | 75–125 lbs | Concrete/masonry |
| Toggle Bolt | Steel | 40–60 lbs | Plaster (temporary) |
Leveling And Shimming: Getting Cabinets Perfect
Level cabinets are the foundation for good countertops and long-term durability. Walls and floors in homes are rarely perfect, especially in older houses.
- Shim under base cabinets if the floor dips or rises.
- Shim behind upper cabinets if the wall bows inward.
- Check with a long level at every step.
- Trim shims flush with a utility knife after installing screws.
Uneven cabinets will cause countertop cracks, doors that won’t close, and gaps that look unprofessional. Take your time and check your work often.
Electrical, Plumbing, And Other Obstacles
You’ll often find outlets, water lines, or vent pipes where you want to mount cabinets. Always turn off power and water before working near these areas.
- Outlets: Cabinets can be notched or drilled for wires, but never cut large holes in the cabinet’s structure.
- Plumbing: Drill only as large as needed for pipes. Support the cabinet so holes don’t weaken the frame.
- Gas lines: If you see a gas line, STOP. Call a licensed professional for any cuts or modifications nearby.
If you’re uncertain, call a pro before cutting or drilling. Mistakes with utilities can be expensive and dangerous.
Table: When To Diy Vs. Call A Pro
To help you decide when to do it yourself and when to hire help, here’s a quick reference:
| Scenario | DIY Friendly? | Pro Recommended? |
|---|---|---|
| Standard drywall, simple layout | Yes | No |
| Concrete or masonry wall | Possible | Yes (for tools & anchors) |
| Electrical/gas/plumbing in wall | No | Yes |
| Wall out of plumb or level | Yes (with patience) | Optional |
| Heavy custom cabinets | Not recommended | Yes |
Common Mistakes To Avoid
Even careful DIYers make mistakes. Here are some of the most common, and how to prevent them:
- Missing studs: Never trust drywall anchors for cabinets.
- Overtightening screws: This can crush cabinet backs and weaken the hold.
- Skipping shims: Leads to uneven, wobbly cabinets.
- Not checking level often: One crooked cabinet throws everything off.
- Forgetting to remove doors and shelves: Make cabinets lighter and easier to handle before lifting.
- Ignoring safety: Always wear eye protection and have a second person help with heavy lifting.
Safety Precautions
Cabinet installation isn’t usually dangerous, but accidents can happen. Here’s how to stay safe:
- Lift with your legs, not your back. Upper cabinets often weigh 40–80 pounds, and awkward shapes can cause injury.
- Use a sturdy ladder or step stool—never stand on countertops or chairs.
- Wear eye protection when drilling or cutting.
- Turn off power and water before working near outlets or pipes.
- Have a helper. Even experienced installers rarely work alone.
Remember, cabinets falling during install can break bones or damage your home. Don’t rush.
Real-world Example: Bathroom Cabinet Makeover
A homeowner in Texas wanted to install a floating vanity in her bathroom. The wall behind was drywall over wood studs, but an old vent pipe ran through the planned cabinet area. Instead of guessing, she hired a plumber to reroute the pipe, then attached the vanity using 3” cabinet screws into two studs.
She used a ledger board for support, checked for level at each step, and finished with paint and caulk. The result was a rock-solid, beautiful vanity—no cracks, wobbles, or surprises.
Touch-up And Finishing
Once your cabinets are secure, finish the job with these steps:
- Fill visible holes with wood filler or caulk as needed.
- Touch up paint around edges.
- Install doors and hardware after all cabinets are attached and checked for level.
- Clean up dust and debris with a shop vacuum.
- Double-check that all cabinets are secure and doors open freely.
Advanced Tips For A Professional Finish
- Use a laser level for long runs of cabinets—more precise than a bubble level.
- Mask off floors and countertops with tape and drop cloths before starting.
- Pre-fit all cabinets before final attachment, especially in tight spaces.
- Consider cabinet hanging rails (French cleat systems) for heavy or garage cabinets.
- Label each cabinet before removing doors or shelves to speed up reassembly.
Table: Cabinet Attachment Methods At A Glance
Here’s a summary of common attachment techniques:
| Method | Pros | Cons | Best Use |
|---|---|---|---|
| Direct screw into studs | Strong, simple, code-approved | Requires precise stud finding | Most walls |
| Ledger board assist | Makes solo installs easier | Extra step to patch wall | Upper cabinets |
| French cleat rail | Highly adjustable, reusable | Extra cost, planning | Heavy/garage cabinets |
| Masonry anchor | Works on concrete/brick | Needs hammer drill | Basements, garages |
Frequently Asked Questions
How Do I Find Wall Studs Behind Drywall?
Use a stud finder and move it slowly across the wall. Mark each stud’s center with a pencil. In older homes, double-check by driving a small nail to confirm solid wood.
Can I Attach Cabinets Directly To Drywall?
No, never attach cabinets only to drywall. Drywall cannot support the weight. Always screw into wall studs or use proper masonry anchors for concrete.
What Screws Should I Use For Mounting Cabinets?
Use 2 1/2″ to 3″ cabinet screws with washer heads, designed for wood studs. For masonry, use Tapcon or similar anchors.
Do I Need A Permit To Install Cabinets?
Usually no, but if you’re moving plumbing, gas, or electrical, a permit and inspection may be required. Check with your local building department.
What If My Wall Isn’t Level Or Straight?
Shim behind and under cabinets to correct unevenness. Check for level and plumb at every step. Take your time—uneven walls are common, especially in older homes.
Attaching cabinets to the wall is one of those projects that rewards patience and careful planning. The most important part is always anchoring into solid studs and checking for level—if you do that, you’re already ahead of most first-time installers.
The right tools, a helper, and a willingness to measure twice will make the job smoother.
Don’t be afraid to ask for help with tricky situations like concrete walls, gas lines, or electrical issues. And remember, every project is a chance to learn new skills and add value to your home.
For more in-depth code and safety advice, check the National Association of Home Builders.
Attaching cabinets might sound intimidating, but with careful prep and a steady hand, most homeowners can handle this rewarding project. Good luck with your remodel!