Your Trusted Source for Home Fixes & Guides


How to Polish Cement Floor: Easy Steps for a Stunning Finish

Polishing a cement floor can completely change the look and feel of a room. Many homeowners choose this project to create a modern, clean, and low-maintenance surface. But getting a smooth, shiny finish isn’t as simple as running a buffer over the floor.
It takes planning, the right tools, and careful steps to get professional results. Whether you want to improve your garage, bathroom, basement, or even your living room, knowing how to polish cement floors will help you avoid costly mistakes and get a surface that lasts.

In this guide, I’ll walk you through every step based on years of real-world home improvement experience. You’ll learn the tools you need, how to avoid rookie errors, and when it’s smart to call in a pro. I’ll also share a real case study so you can see how these methods work in an actual home.
By the end, you’ll be confident to tackle this project safely and effectively.
Why Polish A Cement Floor?
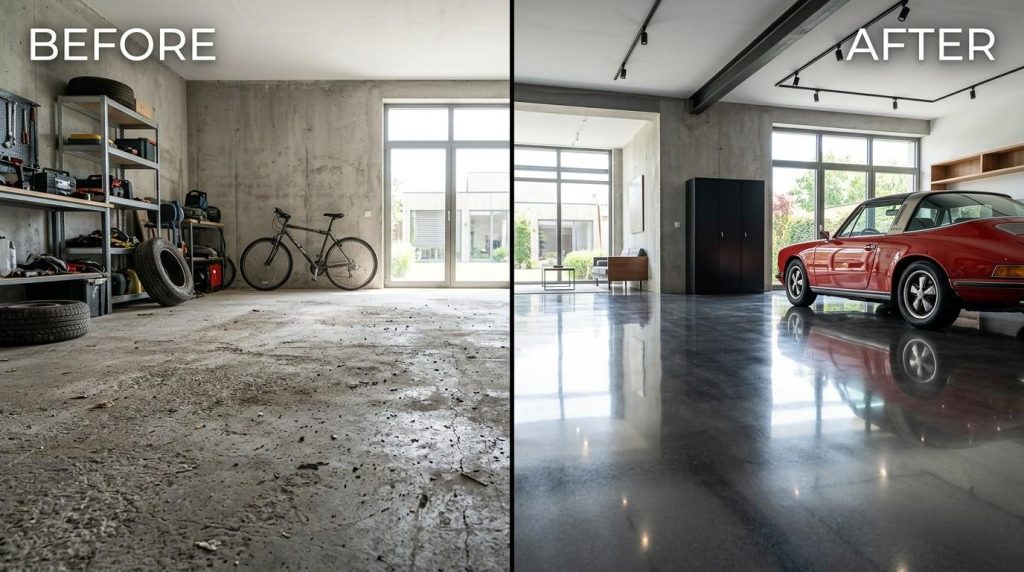
Polished cement floors are popular in both homes and businesses for good reasons. The process creates a surface that’s not only attractive but also durable and easy to clean. Here’s why many people choose to polish rather than cover their cement floors:
- Low maintenance: Polished surfaces resist stains and are easy to sweep or mop.
- Modern style: The glossy look fits with both industrial and minimalist decor.
- Improved durability: Polishing strengthens the surface, making it less likely to chip or crack.
- Cost-effective: No need for expensive flooring materials like tile, hardwood, or carpet.
- Hypoallergenic: No fibers or grout lines to trap dust, pollen, or pet hair.
A polished floor can even reflect light, making a space feel brighter and larger. This is especially helpful in basements and bathrooms where natural light may be limited.
Is Your Cement Floor A Good Candidate?
Not every cement floor is suitable for polishing. Before you start, check these conditions:
- Age of the slab: New concrete should cure for at least 28 days. Polishing too soon can damage the surface.
- Condition: The floor should be structurally sound, with no major cracks, crumbling spots, or moisture issues.
- Flatness: High and low spots make polishing difficult. Minor imperfections are okay, but major unevenness may require leveling.
- Previous treatments: Paint, sealers, or adhesives left on the cement must be removed before polishing.
If your floor has serious cracks, constant dampness, or extensive pitting, consult a professional. Sometimes repairs are needed before you can start polishing.
Tools And Materials Needed
Polishing cement requires specific tools and supplies. Here’s a breakdown of what you’ll need for most home projects:
Essential Tools
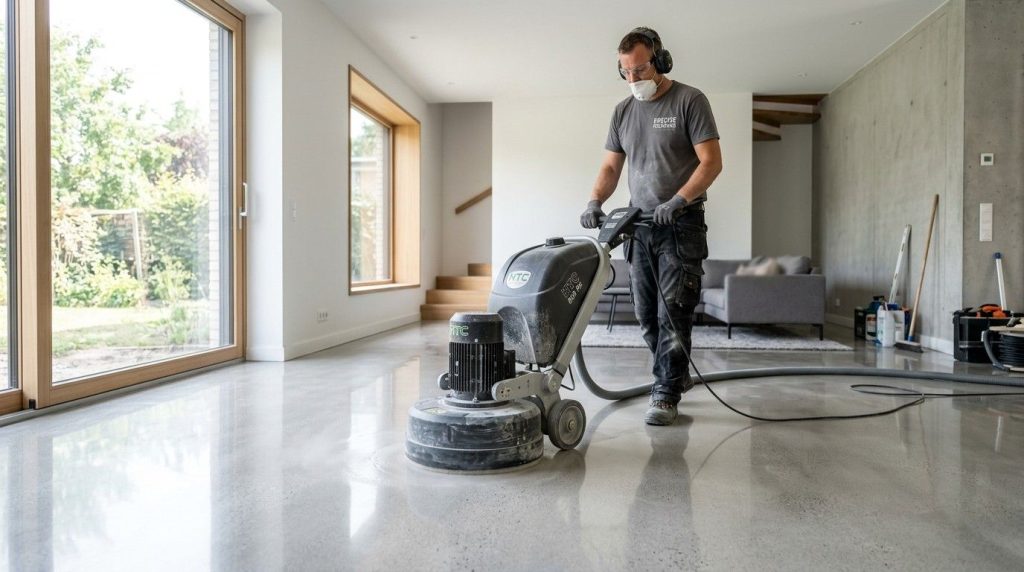
- Concrete grinder or polisher: A heavy-duty machine with rotating diamond pads.
- Diamond polishing pads: Start with a coarse grit (30-50), then medium (100-200), and finish with fine (400-3000) for a glossy shine.
- Shop vacuum: For dust collection during grinding and polishing.
- Handheld grinder: Useful for edges and tight corners.
- Bucket, mop, and clean water: For cleaning between steps.
- Patching compound: To fix cracks or holes before polishing.
Safety Gear
- Respirator mask: Protects from fine cement dust.
- Safety glasses or goggles: Prevents debris from getting in your eyes.
- Hearing protection: Grinders are loud.
- Sturdy gloves: For handling equipment and chemicals.
- Knee pads: If you’ll be working on your hands and knees.
Optional But Helpful
- Edge pads: Special attachments for getting close to walls.
- Concrete densifier: Hardens the surface for extra durability.
- Concrete sealer: Adds water and stain resistance after polishing.
Renting a grinder is smart for most homeowners. These machines are expensive to buy and heavy to store. Most equipment rental centers offer different sizes, so choose one that fits your space.
Quick Comparison: Grinder Types
Here’s how the main types of grinders stack up for home use:
| Grinder Type | Best For | Pros | Cons |
|---|---|---|---|
| Walk-behind | Large, open areas | Fast, even polishing | Heavy; may be hard to move upstairs |
| Handheld | Edges, corners | Precise control | Slow for big rooms |
| Planetary | Professional finishes | Best shine, smooth results | Expensive to rent |
Preparing Your Cement Floor
Preparation is crucial. Skipping this step leads to poor results and wasted effort.
- Remove all items: Clear the room completely. Polishing creates lots of dust and debris.
- Sweep and vacuum: Get rid of dirt, sand, and loose particles.
- Remove old coatings: If your floor was painted or sealed, strip these with a scraper or chemical remover. Grinding over paint clogs the pads.
- Fix cracks and holes: Use a patching compound made for concrete. Smooth the surface with a putty knife and let it cure fully.
- Check for moisture: Tape a square of plastic to the floor overnight. If water collects underneath, address the moisture issue first. Polishing a damp floor can cause long-term problems.
Common Mistake: Skipping Repairs
Many DIYers want to save time and skip patching cracks. This leads to uneven shine and weak spots where the polish won’t hold. Always repair damage before grinding.
Step-by-step Guide To Polishing Cement Floors
With your tools ready and the floor prepped, it’s time to polish. This section covers the main steps, with advice for each phase.
1. Coarse Grinding
Start with your coarse grit diamond pad (usually 30 or 50 grit). This step removes surface imperfections, stains, and small bumps.
- Attach the pad to your grinder.
- Work in small sections, moving slowly and evenly.
- Overlap each pass by one-third to avoid streaks.
- Use a shop vacuum as you go to collect dust.
If you see deep scratches or missed spots, go over them again before moving to the next grit.
2. Patching And Cleaning Again
After the initial grind, inspect the surface. Now is the time to fill any small holes or cracks you missed earlier. Let the patch dry, then gently grind over those areas to blend.
Vacuum thoroughly and mop with clean water. Any dust left behind will affect the next polishing steps.
3. Medium Grit Polishing
Switch to a medium grit pad (100-200 grit). This step smooths the surface and starts to bring out a soft sheen.
- Repeat the same grinding pattern, overlapping each section.
- Check for any remaining rough spots—address them before moving on.
4. Apply Concrete Densifier (optional But Recommended)
A concrete densifier is a liquid that penetrates the floor and reacts with calcium in the cement. This makes the surface harder and more durable.
- Pour or spray the densifier evenly over the floor.
- Let it soak in according to the product instructions (usually 20-60 minutes).
- Allow the floor to dry completely before continuing.
Densifiers are especially helpful in high-traffic areas, garages, and bathrooms where water resistance matters.
5. Fine Grit Polishing
Now switch to a fine grit pad (400-3000 grit). The higher the grit, the shinier your floor will be.
- Make slow, steady passes.
- Check the shine after each grit. For most homes, stopping at 800 or 1500 grit gives a nice, glossy look without being slippery.
6. Edge Work
Corners and edges are tricky. Use a handheld grinder with matching pads to reach these spots. Take your time—rushing leads to uneven shine.
7. Final Cleaning
Vacuum and mop the floor one last time. Any dust left on the surface will dull the shine and may get trapped under a sealer.
8. Apply Sealer (optional)
A concrete sealer isn’t required, but it adds extra protection from spills and stains—especially in kitchens or bathrooms.
- Use a roller or sprayer to apply a thin, even coat.
- Let it dry according to the label (usually 24-48 hours).
- Avoid walking on the floor during this time.
Sealers come in gloss, semi-gloss, and matte finishes. Pick the one that matches your style.
Case Study: Bathroom Floor Transformation
Let’s look at a real example to see these steps in action.
Homeowner: Cindy, a DIY enthusiast in Ohio
Project: Small basement bathroom, 60 square feet
Problem: The floor was rough, stained, and had a few shallow cracks. Cindy wanted a low-maintenance, modern look without replacing the slab.
Step-by-step Results
- Preparation: Cindy removed the old vinyl tiles and adhesive with a scraper. She filled three small cracks with a concrete patch and let it cure overnight.
- Grinding: Using a rented walk-behind grinder and 30 grit pad, she leveled the surface. She used a handheld grinder for the tight spots around the toilet.
- Medium Grit: After vacuuming, she switched to 100 grit and repeated the process.
- Densifier: Cindy applied a lithium silicate densifier, allowing it to dry for several hours.
- Fine Grit: She finished with 800 grit, giving the floor a soft, reflective sheen.
- Sealing: For water protection, Cindy rolled on a low-gloss concrete sealer.
Time required: 2 days (including drying time)
Cost: About $120 for tool rental, pads, densifier, and sealer
Result: The bathroom looked brighter, cleaner, and more spacious. Cindy said, “It feels like a new room, and I love how easy it is to mop.”
Non-obvious Insight
Cindy found that spending extra time on the coarse grinding made the later steps much easier. Rushing the early stages is a common mistake—deep scratches left at the start will show through even the best polish.
Comparing Polished Cement To Other Flooring
Wondering how a polished cement floor stacks up against other common options? Here’s a quick comparison:
| Flooring Type | Cost per sq ft (installed) | Maintenance | Durability | Water Resistance |
|---|---|---|---|---|
| Polished Cement | $3–$8 | Low | High | Good |
| Vinyl Tile | $2–$6 | Low | Medium | Excellent |
| Ceramic Tile | $5–$10 | Medium | High | Excellent |
| Laminate | $3–$7 | Medium | Low-Medium | Poor |
| Carpet | $4–$8 | High | Low | Poor |
As you can see, polished cement is one of the most durable and low-maintenance options, making it ideal for bathrooms, basements, and garages.
Safety Tips And When To Call A Pro
Polishing cement is a DIY-friendly project, but it’s not risk-free. Here’s how to stay safe and know your limits:
Safety Precautions
- Always wear a respirator—cement dust is hazardous to your lungs.
- Use hearing protection. Grinders are very loud.
- Wear gloves and goggles to protect your hands and eyes.
- Never operate a grinder without reading the manual first.
- Keep children and pets away from the work area.
When To Hire A Professional
Some situations call for expert help:
- Large or multi-room projects: Professionals can finish faster and with better equipment.
- Major cracks or moisture issues: Underlying structural problems should be fixed by a pro.
- Desire for a mirror-like finish: High-gloss commercial results are tough to achieve as a beginner.
- Time constraints: Pros handle the mess and clean-up efficiently.
If you’re unsure, get a quote from a reputable local contractor. Sometimes the cost is worth the time and hassle saved.
Maintenance And Cleaning Tips
A polished cement floor is simple to care for, but a little routine maintenance will keep it looking its best.
- Sweep or vacuum regularly to remove dirt and grit that can scratch the surface.
- Mop with plain water or a mild pH-neutral cleaner. Avoid harsh chemicals that can dull the shine.
- Wipe up spills quickly to prevent staining—especially oil or acidic liquids.
- Reapply sealer every 2–3 years in high-traffic areas.
Avoid using wax or polish meant for other types of flooring. These can build up and make the cement look cloudy.
Common Mistakes To Avoid
Many homeowners dive into this project without understanding what can go wrong. Here are the most frequent mistakes, and how to avoid them:
- Skipping surface repairs: Cracks, holes, and uneven spots will show through the final polish.
- Not cleaning between steps: Dust left on the floor scratches the surface as you polish.
- Using the wrong pads: Always follow the grit sequence—jumping ahead leaves the floor dull.
- Applying sealer too soon: The floor must be completely dry, or the sealer won’t bond.
- Over-polishing: Too much grinding with a fine pad can make the floor slippery, especially in bathrooms.
If you’re unsure at any step, pause and check instructions or ask for advice. Rushing leads to poor results and frustration.
Advanced Tips For Best Results
If you want your floor to stand out, here are some advanced ideas:
- Add color: Concrete stains or dyes can be applied before polishing for a unique look.
- Create patterns: Use painter’s tape to make borders or geometric designs, then polish at different grits.
- Combine finishes: Leave some areas matte and others glossy for visual interest.
Test any new technique on a small, hidden area first. Cement is permanent—mistakes are hard to fix.
For more technical information, the Wikipedia page on polished concrete offers a good overview.
Frequently Asked Questions
How Long Does It Take To Polish A Cement Floor?
The time depends on the floor’s size and condition. For most bathrooms or small rooms, expect 1–2 days including drying time for patches, densifier, and sealer.
Can I Polish Old Or Painted Cement Floors?
Yes, but you’ll need to fully remove paint or old sealers first. Grinding over paint clogs pads and leads to uneven results. Old cement may need extra patching.
Will Polishing Cement Make The Floor Slippery?
A polished floor can be slippery when wet, especially at very high shine levels. For bathrooms or kitchens, consider using a matte or semi-gloss finish, or adding a non-slip additive to the sealer.
How Often Do I Need To Reseal A Polished Cement Floor?
Most homeowners reseal every 2–3 years, or sooner in high-traffic areas. If water stops beading up on the surface, it’s time to reseal.
Is It Cheaper To Polish Cement Myself Or Hire A Pro?
DIY is usually less expensive, especially for small spaces. However, professionals can save time, deliver higher-gloss finishes, and handle repairs if your floor has major issues.
Polishing a cement floor is a rewarding project that brings lasting benefits. With the right tools, a bit of patience, and the tips in this guide, you’ll create a surface that’s both beautiful and built to last. Remember: preparation is everything, and never hesitate to ask for help if you hit a snag. Happy polishing!