Your Trusted Source for Home Fixes & Guides


How to Shim a Door: Step-by-Step Guide for a Perfect Fit

Shimming a door is one of those home improvement jobs that sounds technical, but it’s actually a practical skill any homeowner can learn with a bit of guidance. Maybe your bathroom door won’t latch, your bedroom door drags on the carpet, or you notice a chilly draft sneaking through the front door during winter.
Often, the root problem is a door that’s out of alignment. Learning how to shim a door can help you fix these issues yourself, save money, and avoid unnecessary frustration.
I’ve spent years remodeling bathrooms and fixing tricky doors in old homes and new builds. In this article, I’ll walk you through the entire shimming process—from figuring out if you really need to shim your door, to the tools you’ll need, to the small details that make the difference between a door that closes with a click and one that slams or sticks. I’ll also share a real-life case study to show how the process works in practice, plus a few common mistakes you’ll want to avoid. By the end, you’ll know exactly how to shim a door with professional results, and when it’s smart to call a pro.
Why Doors Go Out Of Alignment
Doors can fall out of alignment for several reasons. The most common culprit is settling—homes naturally shift over time, especially in areas with changing moisture levels or unstable soil. Even new homes aren’t immune. Poor installation, humidity, and repeated slamming can all cause door frames to move or twist. Sometimes, the weight of a heavy door will cause hinges to sag or screws to loosen, making the door rub against the frame or leaving an uneven gap at the top or bottom.
It’s important to fix alignment problems early. A misaligned door can:
- Damage flooring or carpeting by scraping
- Make your home less energy efficient by letting in drafts
- Reduce privacy and security if the latch doesn’t catch
- Look sloppy, which hurts home value
Shimming is a straightforward way to correct these problems without replacing the whole door or frame.
What Does “shimming” A Door Mean?
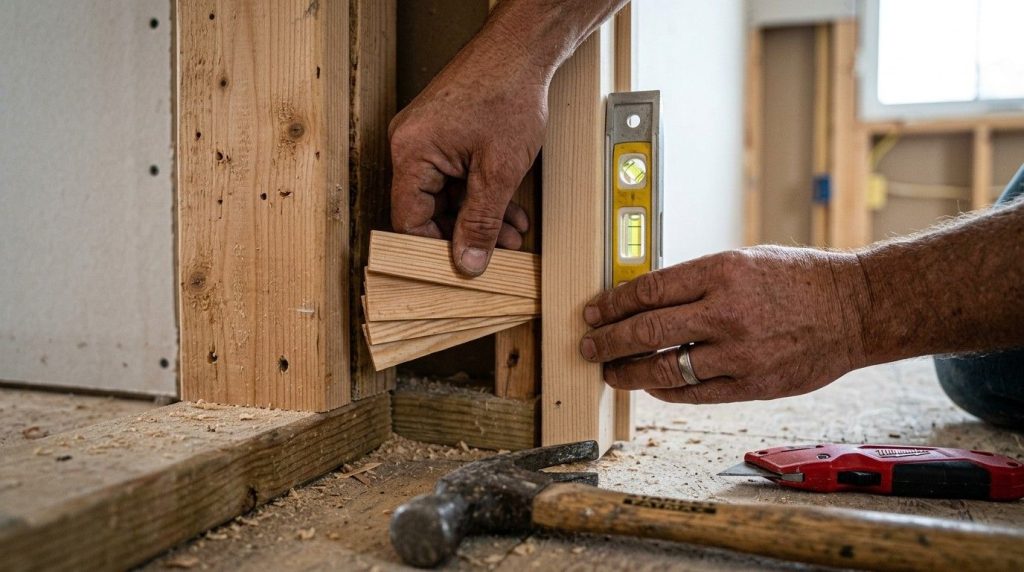
When we talk about “shimming” a door, we mean inserting thin, wedge-shaped pieces—called shims—between the door frame and the wall stud behind it. The goal is to adjust the frame so it sits straight and square, allowing the door to open, close, and latch properly.
Shims are usually made of wood or plastic. They come in different lengths and thicknesses but are typically tapered, so you can stack or trim them as needed. Professional installers use shims during the original door installation, but you can add or adjust them later if a door starts to sag or bind.
Signs Your Door Needs Shimming
Not every door problem means you need to shim. Here are clear signs that shimming is the right solution:
- The door rubs or sticks against the floor, frame, or top jamb.
- The gap around the door isn’t even (wider at the top than the bottom, for example).
- The latch won’t catch, or you have to lift the door to lock it.
- Drafts or light come through around the closed door.
- Hinge screws always come loose even after tightening.
If your door is cracked, warped, or badly damaged, shimming may not be enough. In those cases, replacing the door or frame is a better option.
Tools And Materials You’ll Need
Before you start, gather these basic tools and materials. This will save you time and make the job smoother.
- Wood shims (plastic is also fine, but wood is easier to trim)
- Hammer
- Nails (1.5–2 inches, finishing nails work well)
- Screwdriver (Phillips or flathead, depending on your hinges)
- Drill (optional, but helpful for stubborn screws)
- Level (2-foot is ideal)
- Utility knife or saw (to trim shims)
- Tape measure
- Pry bar (optional, for removing trim)
- Safety glasses (protect your eyes from flying wood chips)
Optional But Helpful
- Wood filler or caulk (to touch up gaps)
- Paint or stain (to finish any exposed trim or shims)
- Clamps (if you work alone)
Safety Precautions
Shimming is a low-risk DIY task, but a few simple safety steps can prevent accidents:
- Wear safety glasses when removing trim or cutting shims.
- Work slowly to avoid damaging the door, frame, or wall.
- Check for electrical wires or pipes before driving nails into walls.
- Lift the door carefully—solid doors are heavy, and dropping one can injure feet or toes.
If your door is very heavy, or you see evidence of water damage, mold, or termites, call a licensed contractor. Structural problems are best handled by a pro.
Step-by-step: How To Shim A Door
Let’s get into the practical steps. I’ll show you how to shim both a prehung door (frame and door together) and an existing door that’s sagging or sticking. Most of the time, you won’t need to remove the whole frame—just the trim around it.
1. Inspect The Door And Frame
Open and close the door a few times. Watch where it sticks, rubs, or has uneven gaps. Use a level to check if the frame is plumb (straight up and down) and if the door sits square in the opening.
If the problem is minor (just a loose hinge screw), try tightening all screws first. If the frame itself is out of alignment, you’ll need to shim.
2. Remove Trim (if Needed)
Carefully pry off the interior casing (trim) on the side where you’ll add shims. Slide a utility knife along the caulk line, then use a pry bar to loosen the trim. Work gently—if you plan to reuse the trim, avoid splitting it.
On most doors, you only need to remove one side. If the gap is especially tight, you may need to remove both sides.
3. Loosen The Hinge Screws
If you’re shimming near the hinges (the most common spot), loosen but don’t remove the screws holding the hinge to the frame. This gives you a bit of play to insert shims.
4. Insert Shims
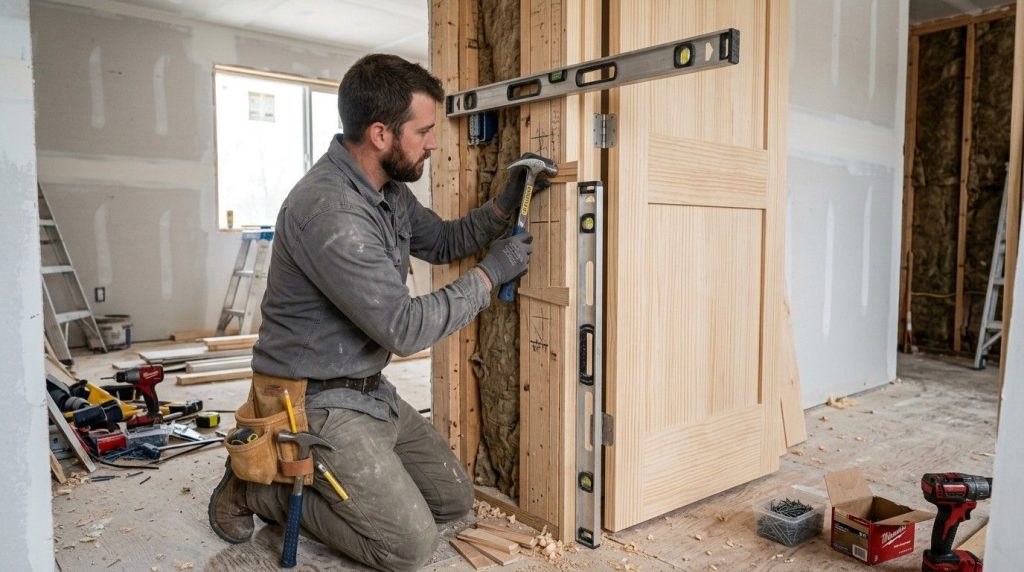
With the trim off and hinge screws loose, slide a shim (or two) between the frame and the wall stud. Place the shim just above or below the hinge. Tap it in gently with a hammer until the frame moves into the correct position.
Check with your level after each adjustment. You want the frame to be as plumb as possible. If you’re shimming the latch side (strike plate), the process is similar—just insert the shims where the gap is widest.
You can stack shims together to fill larger gaps, but stagger them for stability.
5. Secure The Shims
Once the frame is plumb and square, drive a finishing nail through the frame and shims into the wall stud. This locks the shims in place. Tighten the hinge screws again.
If you’re working alone, a quick clamp can hold the frame while you nail.
6. Trim The Shims
Use a utility knife or small saw to cut off any part of the shim that sticks out past the frame. The surface should be flush so the trim fits neatly when you reinstall it.
7. Test The Door
Open and close the door several times. Check for smooth operation, even gaps, and proper latching. If needed, make small adjustments by adding or removing thin slices of shim.
8. Reinstall Trim
Nail the trim back in place. Use wood filler or caulk to touch up any small gaps. Paint or stain as needed for a finished look.
Case Study: Fixing A Sticking Bathroom Door
Let’s walk through a real-life example. Last fall, I helped a friend whose bathroom door wouldn’t close. The house was built in the 1960s, and over time, the door frame had twisted slightly. The top corner rubbed against the frame, and the latch didn’t align with the strike plate.
Step 1: We checked the hinges—tight, but the frame was off.
Step 2: Removed the trim on the hinge side with a pry bar.
Step 3: Loosened the top hinge screws, inserted two wood shims above the hinge, and tapped them in until the frame moved slightly.
Step 4: Used a level to check vertical alignment, then secured the shims with two finishing nails.
Step 5: Trimmed the shims, reattached the casing, and touched up paint.
Result: The door closed smoothly, the latch worked, and no more scraping. The whole job took about an hour and cost less than $10 in materials.
Comparison: Wood Vs. Plastic Shims
Not sure which shim material to use? Here’s a quick comparison.
| Feature | Wood Shims | Plastic Shims |
|---|---|---|
| Cost | Lower | Higher |
| Trim with knife | Easy | Harder |
| Moisture resistance | Poor | Excellent |
| Load-bearing | Good | Excellent |
| Availability | Widely available | Sometimes limited |
For most interior doors, wood shims are fine. If you’re working in a bathroom or laundry area where moisture is a problem, consider plastic shims for long-term durability.
Understanding Door Gaps
One of the most common questions I get is, “How big should the gap be around my door? ” Here’s a quick guide.
| Location | Recommended Gap | Reason |
|---|---|---|
| Top | 1/8 inch | Prevents rubbing, allows movement |
| Sides | 1/8 inch | Prevents binding |
| Bottom (interior) | 1/2 inch | Clearance for flooring, airflow |
| Bottom (exterior) | 1/4 inch | Weatherseal, draft protection |
Measure gaps with a tape measure or even a couple of stacked coins. Too-tight gaps will cause sticking, while too-large gaps let in drafts and noise.
Common Mistakes To Avoid
It’s easy to make mistakes when shimming a door, especially if you rush. Here are the top errors I see:
- Using too many shims: Over-shimming can twist the frame and make things worse.
- Not checking with a level: Always use a level, not just your eye.
- Forgetting to tighten hinge screws: Loose screws can undo your hard work.
- Nailing through the shim only: Always drive nails through both the frame and the shim into the stud for a solid hold.
- Skipping safety gear: Flying wood chips and splinters are common. Wear glasses.
When To Call A Professional
Most DIYers can handle shimming a door. But sometimes the job is bigger than expected. Call a licensed contractor if:
- The door or frame is rotted, warped, or moldy
- You see signs of structural movement (cracks in drywall, doors out of alignment on multiple floors)
- There are electrical wires or plumbing running near the frame
- You’re working with a fire-rated door (like a garage entry), which has special requirements
A pro can also help if you want a perfect paint or stain finish, or if you have expensive trim you don’t want to damage.
Advanced Tips For A Perfect Door
Here are a few tricks I’ve learned over the years that can help your door operate smoothly for years:
- Replace short screws: If hinge screws are stripped, use longer 2–3 inch screws to bite into the wall stud.
- Use construction adhesive on the back of the shim for extra holding power—especially for exterior doors.
- Label your trim pieces as you remove them, so they go back in the same spot and fit better.
- Test the door at different times of day—humidity and temperature changes can cause slight movement, especially in older homes.
- Touch up with matching paint or stain right away to protect the wood.
Real-world Data: How Often Do Doors Need Shimming?
Based on industry surveys and my own experience, about 30–40% of homes need at least one door shimmed within the first ten years after construction. Homes in wet or earthquake-prone areas are even more likely to develop door alignment problems.
Case Study: Bathroom Remodel And Door Alignment
During a recent bathroom remodel in a 1985 ranch home, I noticed the new tile floor made the existing bathroom door rub on the bottom edge. Instead of trimming the door, I removed the trim and inserted a thin shim above the top hinge.
This lifted the door just enough to clear the tile—no need to cut the door or replace it. The client was happy, and the fix cost under $5.
Cost Breakdown: Diy Vs. Professional
Wondering if it’s worth doing it yourself? Here’s a typical cost comparison.
| Item | DIY Cost | Professional Cost |
|---|---|---|
| Shims (pack of 12) | $2–$5 | Included |
| Finishing nails | $3 | Included |
| Labor (1–2 hours) | Free | $80–$200 |
| Total | $5–$10 | $80–$200 |
DIY shimming is one of the best values in home repair—cheap, fast, and rewarding.

Frequently Asked Questions
How Do I Know Which Side Of The Door To Shim?
Shim the side where the gap is uneven or where the door rubs. For doors that drag at the top, shim above the top hinge. If it drags at the bottom, shim below the bottom hinge. Always check with a level to confirm.
Can I Use Cardboard Or Other Materials Instead Of Wood Shims?
While cardboard might work for a quick fix, it won’t hold up over time, especially in humid areas. Wood or plastic shims are stronger, more durable, and made for the job.
What If My Door Still Doesn’t Close After Shimming?
Check for other issues like warped doors, stripped screws, or loose hinges. Sometimes the latch plate also needs adjusting. If you can’t solve the problem after careful shimming, call a contractor.
Do I Need To Remove The Entire Door To Shim It?
Usually, no. Most shimming can be done by removing the trim and loosening the hinges. Only in rare cases—like a badly twisted frame or exterior doors—will you need to remove the door itself.
Where Can I Learn More About Door Installation And Repair?
For detailed guides and professional advice, check out the Family Handyman website, which offers step-by-step tutorials and videos.
Shimming a door is a great DIY project that can solve annoying problems and improve the comfort, appearance, and value of your home. Take your time, use the right tools, and you’ll get results you can be proud of. If you ever feel in over your head, don’t hesitate to reach out to a licensed pro.
Sometimes, the best DIY skill is knowing when to ask for help.